I have about 8 Rotary cutters in my collection. From cutting circles, wave/pinking patterns, to using different sizes for different types of projects, etc. Through the 45mm family of cutters, I explain how each cutter is used and discuss the ease of replacing/changing the blades.
Pardon the background ‘noise’ as my boy was playing with his lego bricks nearby.
The cast:
1) Wave cutter: WAC-2
2) 45mm Rotary Cutter: RTY-2/G
3) 45mm Deluxe Rotary Cutter: RTY-2/DX
4) 45mm Quick-Change Rotary Cutter: RTY-2/NS
If the player is acting up, you can click here to view the video too.
*UPDATED 22nd Aug 2011
In the video, I mentioned that the 45mm cutters can use either the straight and decorative blades interchangeably. But upon scrutiny of the packaging of the cutters, there are some cutters that will take either type of blade, or both.
1) Wave cutter: WAC-2 (Can use ALL decorative blades – no indication that straight blade RB45 is supported)
Been sewing more than blogging. Good thing, I say.
And in a bid to clear out more space, I revisited my oldestquiltingWIP – the beginner quilt that I started at Quilts and friends in late 2006.
The quilting stitches vary across the quilt – the earlier quilting were longer and the most recent ones are shorter. At one stage, I wanted to send it out to be finished by another quilter as I was pretty tired of this bundle taking up space in my cupboard. But over the weekend, I used my brand new Karisma pencils and finished marking the quilting lines in a jiffy. One of the reasons (or excuses) why I put it away was that I had a hard time marking the quilts with fabric pencils that broke so easily – at one point I swore I was sharpening the pencils more than marking the fabrics, and also finding a colour that shows up well.
Our work loft is a little messy right now… With all the recent buys and also new projects, it is a little hard to keep things neat and tidy.
I started on a new project a couple of days back (yes, yet another queen-sized quilt) and so far, I’ve made quite a good progress (by my standards!). During the process, I took my time to cut some blocks, sew some, iron some, square up some… relishing each stage of production (read: I get bored easily). So, there are many mini piles of blocks/patches in various states of WIP scattered all over the sewing area and it was tricky moving the blocks/patches from the sewing machine to the ironing board, etc. And today at Daiso, I found the perfect helper!
These trays are like tubs without lids, and yet I’m able to stack them up. PERFECT. The little lids/catches at the sides are not very strong and I doubt they will hold much weight or many trays, but these trays are soooo handy and just what I need to get the little blocks organised for the sewing table/cutting/iron boards.
At SGD$2 a tray, it is really a good buy!
Here’s a sneak peek at what are in the trays right now:
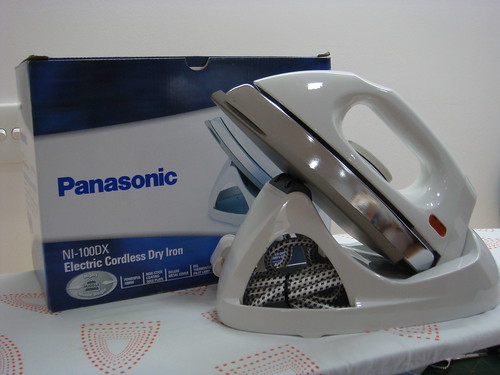
I have a small working area and a smaller ironing board. and I HATE it when the wire gets in the way (and cause more creases) when I have to press those backings or bigger quilts.
And I found this beauty at the departmental store today. It costs about US$40.00 and I HAD to have it. It is a medium weight dry iron, different from my regular steam iron (I don’t use the steam function for the quilts) which weighs next to nothing :p These lightweight steam irons are good for clothes, but not quite the thing when it comes to quilts!
Hubby was surprised that I would want an iron this heavy :p I explained that quilting is about PRESSING, not’ironing’… I think that left him more confused than ever! haha.
I’ve just applied the border to one side of my Star QAL and I’d love to try out this iron on the quilt then. I have not fired up this baby yet – not in the greatest shape to stay up in the studio tonight and sitting at the machine. I think I’m coming down with a flu or something… throat’s a little scratchy and bones a little achy… not in the mood to get on the floor to pin the borders on tonight. Guess I will continue with my handquilting my sampler in bed then! ;>