Archive / Quilt

RSS feed for this section

Trip Around The World – DONE DONE

I’ve been loving this project since Day 1. The top got done quite quick and then I put it away after basting it for quilting. I meant for this project to be my 30th present for myself. But that came and went, and I didn’t get it quilted in time.
Over the New Year, my only craft-related resolution was: Finish what I have started, before I start something that I don’t finish (quickly) again. So, in the past weeks, I have been doing small projects for the home and for the boy – more about those later on. I’ve pieced 3 more backings for my completed tops so that I can get them quilted and Done Done sooner.
With a good friend’s birthday around the corner, I thought I’d gift the TATW to her – as I remembered her liking it when I showed her the WIP. So, it was a few days of intense quilting during Benji’s naps & bedtime. Here’s the final product! It’s a lap-sized square quilt, but it covered just the top of my Queen-size barely.

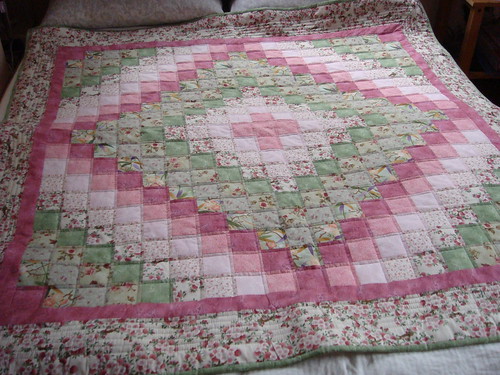
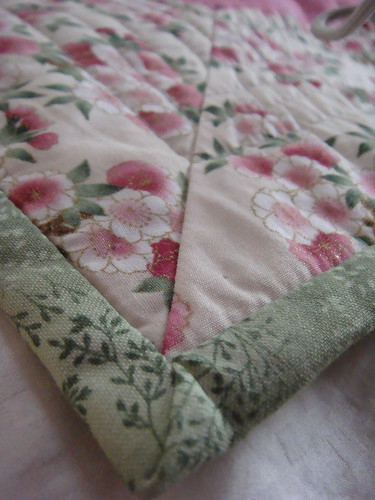
I simply enjoyed putting the binding on and handsewing the back down – I was like: Done already?! . Never mind that the mitered border & the mitered binding don’t match much, it’s still my pride and joy :>
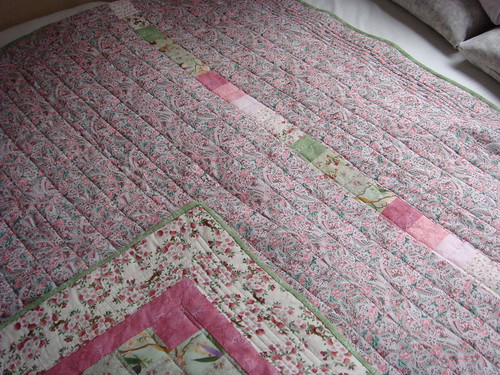
I quilted in straight lines with the walking foot – even then my lines are not all that straight!
Here’s how the back of the quilt looks like. LOVE IT.
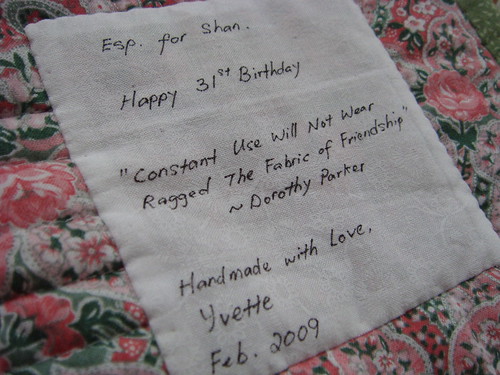
For the label, I grabbed a verse from Dorothy Parker – how apt for a quilty gift for a friend! :>

Good Buys 2

December has been a month of crafty indulgence for me :>
Well, I haven’t given into temptations YET with all the online fabric stores’ sales & coupons. But I have been checking out the local crafting supplies stores, stocking up on notions and what-nots.
A couple of weeks ago, I visited a local store in Chinatown. They sell loads & loads & loads of Clover products that made me a very very very happy girl :>
Here’s what I bought finally, and I did show some restraints when I returned a few items at the cashier before I checked out the items :p
1) The mesh transfer sheet – handy for transferring quilting patterns without cutting out template sheets.
2) Bias Tape Maker – you need one for each size!
3) Gauge – which came in very useful when I had to fold over 1/8 seams in my last project. But this gauge is in metric, so I had to measure it against my other imperial rulers first.
4) Water soluble marker – gosh, this works like a charm for me! Why I didn’t get this much earlier is beyond me. LOVE IT! The marks wash out beautifully and most importantly, the marking is much more accurate and clear.
5) Iron-on transfer-pencil – I love the idea that I can trace out a pattern with this pencil and then transfer it to the fabrics just by simply ironing on it. Downside is that the markings will be permanent. No immediate plans/projects that call for this pencil yet. :p
6) Fabric glue stick – this will be useful for the applique works
7) Variegated thread – too pretty to be left out of the shopping basket ;>
8) Heat & Bond No Sew fusible web – I was thinking of making some ‘iron-ons’ for friends who don’t sew. This is perfect for such ‘painless’ projects.
I do consider myself somewhat of a ‘gadget-girl’ (I love gadgets, but I don’t go queueing up for iPhones just to be the first ones to get it…), and perhaps that explains why I fell in love with sewing again, after all these years. All the toys that you can buy for just marking patterns! For cutting fabrics! And once, I spent an entire day just search and surfing for various presser feets and their functions… And of course, the Internet has also made researching much easier and interesting, bringing me all the inspiring blogs of people who share their love & passion for their crafts.
Alrighty. Time to get back to work now and earn more $$ for my crafty fund (and Benji’s diapers :p) ! ;>

Christmas Skirting the issue

The Christmas Skirt is officially off the tree this year.
Here’s a quick look at the ‘finished product’. Nope. It’s not been washed yet – I’m terrified of the colours running (I didn’t pre-wash the fabrics for this project)… but let me figure out a way to get this in the wash without too much drama later on.
Applique close-up. Featuring the 12 gifts for the 12 days of Christmas.
The tree would have been PERFECT with this skirt under it. But, its not meant to be, for this year, at least. :p

So, we have ‘relocated’ the skirt to adorn the old-style coffeeshop table and placed the candlestickholder/wreath over the centre to cover the hole. Perfecto!

It’s starting to feel a lot more like Christmas now! :>

My Christmas ‘mini-Skirt’

AND THEN… I realised it was too SMALL for our tall tree! 🙁 What a HUGE disappointment!
I should have at least measured the size of the tree stand when I started on this project, but I didn’t. I’m so disappointed with this, and I even contemplated running out to buy a baby tree so I can dress it up with the skirt. But what am I going to do with 2 trees in the house? 🙁
So, I’m going to think up a way to use this skirt then… More pictures later.

I’ve been busy sewing up coasters for our Christmas dinner this year. And the cat is enjoying all the activity because she has a nice warm board to cosy up to after I’m done with it. :p

Let me go have a think about the Skirt now… headache, heartache! 🙁

12 Days of X’mas – Tree Skirt

I’ve been complaining A LOT these days that the malls are putting up X’mas decor earlier each year.
On the other hand, I’ve been keeping my eyes open for X’mas gifts, planning schedules around the holidays and also keeping a list of things that I will need to do, clean, craft in time for X’mas. The X’mas tree skirt pattern caught my eye when I was at the local quilt shop. I attended a couple of sessions at Quilts and Sew Forth and this is what I have done up so far! :>
The creases you see are due to the folding and packing. I chose 7 different X’masy fabrics and a lovely beige/gold background fabric. I chose to cut out the 12 days of X’mas gifts from a panel for the applique, instead of tracing, and hand appliqueing other designs from scratch to the tree skirt. I simply used some Heat & Bond and machine sewed them with a blanket stitch. Quick & Easy! :>

The skirt is now basted and I will machine quilt this baby after I have joined the blocks for Benji’s Zoo quilt. I’m looking forward to this skirt gracing our X’mas tree this year :>